Friday, August 29, 2008

I'm hungry for some bike...anyone got a fork?

On a whim, I decided to work on Eric's fork today. I'm building a Ho down box crown fork with hooded dropouts, disc tab, and removable canti posts for Eric. I've got a few other forks in the mix in the near future so I thought I'd make the most of my time and push out some extra tid bits for 6 other forks and make a few other folks happy at the same time.

The crown on the Ho fork is a bit complex, in that it not only needs some exacting mitering for the legs but also a through cut at an angle for the steerer tube that also sets the overall offset for the straight bladed design.

The crown begins it's life as a piece of 2x1 rectangular tubing cut to length. For manipulation, I start off by slitting in the top of the crown for the section that will mate with the fork legs, capping of the top.
Next, I use a hole saw to open up the crown to accept 1/2 of the fork leg, giving superior surface area contact at the point of connection...that gives me a super strong crown that will hold a line well under harsh conditions, allowing the lower legs to absorb the trail chatter.


After the leg slots are filed and cleaned up, I mill off the ends into a circular shape to match the outer diameter of the leg tubing, giving a seamless line when assembled.

The mill is reset with some angle, the piece is centered, and the steerer miter is made.

Once she's all cleaned up, I've got a crown made for a king...that's Eric in this case ;)

Now that the crown is fabbed up, I get to work on the crown race. All races come with a welded seam that prohibits the race from sliding onto the steerer tube, so the inner diameter must be opened and smoothed to a perfect fit. Here's a little delicate work on the lathe...a quick pass, a bit of scotchbrite and it's ready to go...

Once the race is ready, everything is cleaned super duper like, and it is welded together. I fusion weld the race, pulling a bit of material from the inside bottom edge and joining it to the surface of the steerer tube. This is a clean way to install the race, but you MUST be very careful not to undercut the actual steerer, a process that takes experience and precision to accomplish.
Flashing forward, I've cut the fork legs, turned them down in the lathe, mitered them at the dropout end for the splay angle, and fit it all together in the fixture...ready to tack and check.
Once I'm happy with the fit, it's back in the fixture for welding...and wha-la!


I made a similar fork for Carlos earlier in the week , coated it in gloss black, and it looks BADASS!

This is a positive omen for the build...everything is moving ahead nicely.

I'm going to hit the shop early in the morning, then I'm going to take the afternoon off to take Kalten rock climbing...really looking forward to it!

cheers,

rody

Thursday, August 28, 2008

Eric's Kauai 6-5-0 build

Eric's bike is moving forward, finally :)

To give you the low down here is what we are shooting for...

Eric wants a sweet do it all bike that he can take anywhere in the world and if something goes wrong, be able to find parts or switch it up and keep moving. To accomplish this, we are setting up the bike to handle gears or single speed, discs or removable cantis studs, internal cable routing, braze ons galore and designing it to be used with a rigid fork but keeping the geometry balanced to run with the new 650b sussy forks or throw a 100mm 26er fork on the front without it feeling funky. Whew...gonna be a fun build!

So, based off of some good conversation with Eric and some detailed queries, I put together a tube set to keep him on the trail for a lifetime of smiles.

To accomplish the single speed duties, I gonna run the frame with an EBB. EBB's have been around for a long time and due to the single speed movement of late, have become very popular. Unfortunately, if you do much reading/research on them, you'll see a lot of threads from people complaining about how much noise they make, problems with them loosening, etc... The real problem is that the ever present drive to get lighter has crept into this area. Truth be told, many of the issues and new designs have created more problems than they have solved. Want a quiet EBB that won't loosen, the secret is exacting machining and reaming, proper surface area contact, and even tensioning of the shell. I've been spinning up my own shells and using custom machined inserts for years now without any of those issues. Yep, they weigh a few grams more than a Bushnell or the latest kid on the block, but mine will never make you frown ;)

Most of the tubing I'll be using is on the "Just right" sizing for wall thickness and strength...8/5/8 dimensions. This will allow for plenty of material to support the internal cable routing and still give Eric a lively ride.

So, let's get started setting up the fixture!

The fixture setup begins with positioning the seat tube angle off of the bb. The st block runs on a slotted arc and allows for tube over bb position and angle.

Once in place, I set the bb drop and cs length for the build, in this case 44.45 drop and 425.45 length.


Once my drop is set, I throw in my straight edge and work out the front end positions based off of the wheel base; axel to crown length, top tube length, and head tube angle. I'll keep the geometry paper real close to insure I've got it all where it belongs. A quick double and triple check (you hate to find out you were off 1/2 inch once everything is welded) and everything is clamped tight and outlined in marker to be able to visually see if any fixture member moves.

With the fixture ready, lets start prepping the materials. The BB material is cut on the cold saw...

Then the faces are cut parallel, top edge filed, and inside edge deburred.
The lathe is then reset and I begin to bore out the inside diameter of the shell to within a few thousandths to accept the EBB insert.
Here's a shot of the AL insert I use. Like I said, I could mill it out and make it lighter by a few grams, but the full surface area contact of the outer diameter lends great strength to the piece.


Next up I prep the head tube. I cut it to length, face both ends, file the outer edge over, debur the inside lip, then remove some material to allow a perfect press fit for the headset. The high end head set builders (King, Hope, Cane Creek) spin your piece to a numerical perfection, if your builder is not taking the time to bore out the head tube to provide a perfect fit, your going to have some mechanical deformity of all that pretty anodized aluminum, inconsistent surface contact pressure and eventually hear from your headset about it :)

With the main pieces prepped, I hit some Luv Handle work quick to get ready for the September delivery. Mitering on Eric's tubes and welding on some bars forth coming!


The build list is updated on the web site...if you SHOULD be on it and do not see your name, please contact me! For those of you with special time considerations (Mike and Alton), I've not forgotten you.

cheers,

rody

Wednesday, August 27, 2008

The storm has passed...

It's been a while since I last posted, and for that, I apologize.

The unfortunate time constraints that plagued me in my last posting continued for the last week, causing me to forfiet plans from time in the shop to time on the road for the First Flight Vintage Mountain bike festival and Cackalacky Cup.

So, despite the drizzly rainy weather that lingers outside the shop door, my spirits are a bit higher as things are looking up. I've got a good run of days in the shop due me, all the work to get the Hot Rods moving forward is coming to fruition, and some of the stresses of life are melting away as I get back to fabricating.

I'm working on Eric's 650b project today...I'll follow up with some pics tonight and highlight the build process the next couple of days, so stay tuned in :)

For those of you with projects awaiting, Christi and I spent some serious time ironing out the build list so I can get it posted up on the web site. She has been spending more time in the office for me so that I can keep my time focused on producing cool kit for you folk ;)

Thanks everyone for the response on the demo frame...it sold about 3 hours after posting and will be on it's way to a new home next week, all outfitted with XTR and a new metallic purple powder coat.

I've got email a plenty to catch up on, so if you are waiting for a response from me, you should be seeing it in the next 24 hours.

More later...it's good to be back in the shop!

cheers,

rody

Tuesday, August 19, 2008

CAUTION...whiny rant below

I'd like to throw out my apologies to all you folks for being out of contact for a bit, it's the burden of working two full time jobs :(

My last posting was Sunday and I was looking forward to a productive week. Tuesday morning at 0600 I got called into the fire department due to manpower shortages and they would not let me go. In the past seven days worked a record for me...not that I was looking for one.

Ended up working 148 hours out of 168 in seven days at the FD and got in a measly 4 hours at the shop.

This morning I got off and all I wanted to do was sleep, but the foibles of life kept it at bay...the dog kept jumping on me wanting to play, construction at the neighbor's house, kids running around. I finally gave up, showered and lumbered my way down here. I barely manuevered through the door as there are quite a few boxes that landed in my absence and there is a pile of coorespondance on the desk.

The inbox is stuffed with 120 messages, so if you are one of the folks that have tried to get ahold of me the last week, maybe multiple times, I'm gonna do my best to get back to you.

The bad news is I've gotta go back in tonight for a 12 hour shift from 1900-0700, yuck.

Anyhoo, whiny rant over ;)

Some updates:

Grove Hot Rods... I'm going to meet with Bill and Mary this week to pass on all the purchasing info and get an update on the fabrication. If y'all still would like to check out the offerings and perhaps jump in on a set, you can look here... http://www.grovecycledesign.com/


Demo 29er frame for sale... I've got a demo frame that is stripped of paint, inspected, and ready for a new home. The frame is about 1.5 years old and was used for the occasional rider to check out the goods. No dents or dings, straight and true, ready for love. It is a alloy steel frame that uses a mix of Columbus and Dedda tubing, Paragon sliders, s bend stays, and is set up for SS or Rohloff use with disc brakes. The frame measures out with a 24" tt, 16" st, suspension corrected for 80mm suspension, 68mm bb shell, and uses a standard 1.125 headset. Weighs in at around 4.3 pounds on the shop scale. Here's the skinny...you can get the frame with a fresh coat of powder of your color choice for 800 bucks, or custom paint at an additional cost. Drop me an email if you are interested. I'd like to get it out of here this month. Pics of it all built up in it's former state below...


Luv handles... The September list is full and I'm taking reservations for October. This will be one of the last runs for a bit as I've got a bunch of other work to get to so I'll be taking a two month break from these guys. I'm upping production however, and will accept 50 bars for October.


Goyo! please contact me with your fit sheet info...I'd like to get you sorted after Eric's build :)


Cheers all,


rody

Sunday, August 10, 2008

Sunday...a day off?

Nope...planned on taking today off, but fell into the trap of saying;

'I've got so much to do, I'll just run into the shop for a bit"

7 hours later, I'm yearning for a ride so I'm going to hit the blog quick and get on out ;)

Last couple of days went pretty quick. Chris from Texas was in town for a benefit golf tourney for the family and brought his and Danette's bikes for a little riding. They ended up doing something like 80 miles in three outings between family obligations and benchmark outings to Starbucks, pretty impressive.

I tuned up both bikes and sent Chris home with some touch up paint for his subtle polka road bike.

W0rked on the helpless grello Yo a bit. It's been soaking with Liquid wrench for the last week and did not help it a bit, bummer. Ended up cutting up the stem and subsequently shortening the steerer tube to get the frozen front end sections apart. The bottom bracket came out in a mushroom cloud of rusty dust, broken bearings and warped seals. The aftermath was so impressive I had to go get the guys from the shop up front to share the experience with them :)

Today Kalten and I worked on some Luvs; here's a box of grips cut up to raw length, enough for 30 bars to finish up the August list and start the September obligations.

Each one gets faced, internally deburred, and then chamfered on the edge for a smooth finished end. Here's a shot of me hitting the edge with the second cut file...

After deburring, Kalten washed all the oil and debris off of them, all 60 plus pieces. He's got some wrinkly finger tips now...

Me on the other hand, took to the job of sanding all the mill scale off. I'm not so clean :(
All nice and shiny now, I'm ready to weld on the end caps. Got through a few, but the sun outside is calling me to get a ride in yet tonight...


And, saving the best for last, Sophie winged in all the way from dreary England to be my Groovy model of the week.
She's a pretty hip chick...if you're lucky you'll see her speeding around Roanoke, Texas in a new VW bug soon, right Chris?

til tomorrow,

rody

Friday, August 8, 2008

Paint, Paint, painty paint...

Hey folks, nice of y'all to drop in yet again. :)

Spent the last two days working on paint. I promised you pics of Bobs Gulf Stream bike, so here it is...

If you remember, Bob's Yo had some unsightly rack braze ons that had been crudely welded on, resulting in three crateresque holes in the seat stays. Those were repaired and smoothed all in metal, so they should be bomber again and pretty to look at, bringing back the smooth lines of before. The frame was in otherwise good nick; the seat tube, historically an issue on these frames, was clean and sound. There were a few chain suck marks present, but they were inconsequential structurally so it was not worth subjecting the material to the heat to smooth them over.

I started off the paint by laying down a two coat sanded primer to protect the frame for the future. Then is was three layers of powder blue to insure a bomber base for the masking. With the differing humidity levels we experienced the last couple of days, proper reducers and flash times would play a big part in the masking that was necessary, so I wanted to insure I had a solid base for all the tape I'd be laying down.

With the powder blue down, it was time to start masking for the orange...

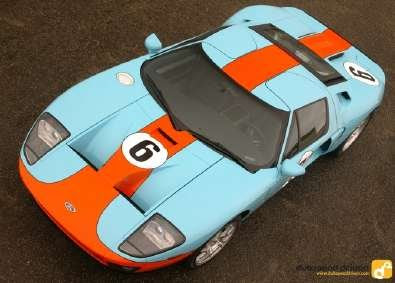
I went through about three false starts with the design. Originally, Bob had desired an orange fork, darts on the top and down tube, and a panel on the seat tube. Looking forward at how the decals would fall was a primary concern...with the darts the decals were too large to fit inside the orange area but would also cover much of the tapering transition. I just didn't feel it was flowing. So I went back to the pics of the cars and came up with a new plan, solid parallel panels that matched the stripe on the cars hood and roof. This would allow me to split the decals on the half and allow the eye to follow the flow of the masking...yeah, that'll work!

Here we are committed to the design and laying down the orange...

After the orange, it's time to separate the orange and blue from touching with some pinstripes. I followed the flow of the original mask and airbrushed in some black after masking...
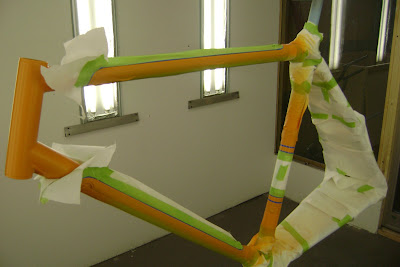
Black is on in all the critical areas...


After all the color is layed down, it's time to remove all the masking. It's kinda like Christmas, anticipating the final look but you want to open this present VERY carefully so as not to lift any of the fragile paint. Once the paper and tape is all off, here's what we have...

I wanted a balanced look to the frame and fork, so I left the fork blue and incorporated one of the white circles for the numbering like is seen on the lateral edges of the car's paint. I hand airbrushed in a little something special for Bob as I did not have a number to run with...his initials, a personal touch to make it his own. ;)
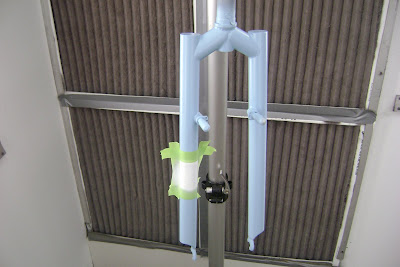
After all the color work is done, I sprayed a layer of clear and baked it all up. A little sanding, wiping, and blowing off and then onto the next step.

Decals and the second layer of clear applied... you can now see how the parallel lines of the pin striping allow the eye to keep flowing down the tube.


And fast forwarding to the third layer of clear, the final product...
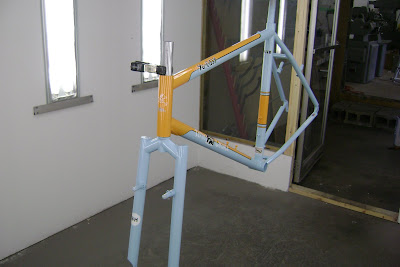

I hope Bob is as stoked with the results as I am. I had fun doing it, it was worth the wait.

As I was working on the Yo, I was alternating booth time with the Grove Ti repaint...here are some shots of it's completed work.

The depth of color came out very nice, showing a deep metallic red over the black base. This will be built up with a mix of anno red and silver components. Should be yummy.


Clean transitions on the dropouts, even where repaired :)

A parting shot...

The last nugget to share today is the arrival of the Gates belt drive components. I'm going to build a 650b single speed along side Erics bike to use these parts on and see how they perform. This will likely be a demo for the fleet or if it comes out really nice, I'll keep it for the upcoming shows and then sell it off.

Anyhoo, the parts are very well constructed, clean and light weight. The one consideration in the frame design is the installation of the belt...you either have to build an elevated chainstay frame or design the frame with a break in it at some point to pass the belt through. I've chosen to incorporate a .75" coupler into the chainstay to facilitate this. Although a split dropout is available, I do not believe it has the same engineered strength and simplicity as the coupler for consumer use.

I'm off to review and finalize Eric's frame, set the fixture, give him a hi-dee-ho, and get back to building. Stay tuned, Eric's frame is going to be one to watch.

cheers,

rody


Tuesday, August 5, 2008

Computer gremlins one, me zero...

Yep, my computer crashed and I've been without for a few days. Back in the game now though. You never realize just how much info you've got stuffed into all those little electronics until it is no longer accessible...wow, it's overwhelming.

Not too much to share...been working on Bob's Yo resto. I'm gonna save the final pic for when the last coat of clear is dry and the frame's been massaged down with some 3M rubbing compound, but here is the paint scheme...

classic Porsche Gulf stream blue and orange...yummy.

In the interim, I've been working on the road frame to get it clear of the fixture so I can set up for Eric's 650b project.

I got the rear end all fabbed up on Monday and it is now free! Still have the little fiddley bits to braze on but it will be ready for paint soon. Still kicking ideas around on this one, hmmm.


All said and done, the finished fabrication came out pretty spiffy. I used some .6mm material for the rear stays and bridge which is getting pretty thin...kinda like welding cob webs together at times :) Torch angle and heat control are key. Gotta move smoothly and evenly.

This should make a sweet dependable ride with some nice lines. As this is not intended as a "race bike", I set it up for some disc brakes for function and performance vs. weight savings. Lots of dialog on discs on road bikes out there, kinda some interesting reading if you have the time. It'll be interesting to see where the market heads in 10 years. Guess we'll have to wait and see.
And as a parting shot, here's a classic piece. This box crown fork belongs to Michael of NY and came off his Wicked that we'll be doing some work on in the near future. I love these...simple, clean, with some funky style thrown in.

cheers,

rody

Sunday, August 3, 2008

Whittling the weekend away...

Hey y'all, Sunday night here in big Woo. Got home from the shop around 8, made the family some supper and now am enjoying a cinematic experience with Kalten...watching a little Talledaga nights. That Ricky Bobby is a little something else.

So here's some shots from the shop the last couple of days.

Let's talk head badges. You know, those happy stainless silver badges that adorn each frame. The badge starts off as a laser cut flat plate; ever wonder how I get those head badges to fit around the round tube? Well, one of the fun parts of building is making the tools that make your job easier.

Below is my head badge former. The flat badge fits into recessed cuts in the concave portion of the tool and is then set into the mill vice with the convex section ready to press it into shape. A little pressure and boom, a nice round shape made to fit the external diameter of the head tube.


I played with some new tig toys on Saturday, seeing if a larger diffusion cup will help with the changing surface areas of the Luv Handles. After playing with some different flow rates, I think I've got it down to where I like it.  I think the final step that I'm going to take is to use an ultrasonic cleaner to insure that each piece is as close to perfection as I can get.

All the custom bars are packed up and shipping out Monday morning. All the July orders are now filled and the August orders are done as well. Kinda a give and take, later than I want for some but early for others.

Today I spent the morning working our fire departments annual "firehouse poker run", a motorcycle ride to benefit our local children's' burn unit. We had 307 participants under clear blue skies and more Harleys than I've seen together for a while. Should be some good money for the kids.

After the run, it was back to the shop. I worked on finishing up the rear end on a road frame. Here are the Dedda stays all fixtured up and ready to miter.
I flew through the rear end on this guy...one cut to fit the chain stays, two cuts to fit the seat stays. Started to feel like I've done this before ;)
Looking down the seat stay fixture at the cutter...

the dropouts viewpoint...
knocking out the seat stays...
and all nuzzled up to the seat tube...should make some easy welding for me.

The rear end is all mocked up and ready to tack together.

Christi was kind enough to snap a pic of me caressing a little Weldmold 880 into the rear end.


Tomorrow starts a new day. I'll weld up the rear end on this road bike, clear the fixture, and get ready for Erics do it all 650b. Now that's a build that'll be fun to watch.
cheers,
rody