Wednesday, January 30, 2008

Filling the world with color...

It's been a long haul the last 5 days. I've been working on paint for the show bikes and the experience over the last couple of days has once again reinforced what I already knew...


It always takes longer than people think it should (including me :) ) and you can not rush paint...you'll spend more time in the long run.


I had 5 frames, 4 forks and a butt load (that's a whole bunch) of bars to spray to get ready for NAHBS.

Long story short, I've slept 12 hours since last Thursday, look and feel like crap, but ended up with some really awesome finished products.


Without letting the cat out of the bag and showing you the show bikes, I thought since we've chronicalled Roy's bike build, I'd share the photos of his paint coming together, so here we go...


I first start off by inspecting the frame to insure that all the finish work is complete; welds closed, no pits in the brazing, all vent holes taped over, paint bolts in the bosses, etc...

Next up is a trip through the blast cabinet to clean the frame and give the material a consistant finish and a little tooth for the primer to seat into.


Once out of the cabinet, the latex gloves go on and the paint begins. I use PPG products the majority of the time, throwing in some House of Kolor for the super fancy stuff. The primer I use is some super tough stuff, like an Armadillo hide, it takes a lot of work to get through it. A solid primer is very important to the protection of your frame, as liquid paint will chip, but it should only reach the tough primer layer, protecting it from the evil oxidation process of rust.


The primer layer is dryed and then sanded to give a super smooth base for the color layers to come. I use 600 grit paper, dry sanding in even covering strokes.


The finished sanded frame is then carefully blown with filtered compressed air to make sure that all dust and fine particulate are removed.


Next up is the series of base colors, masks, and then clears.


One of the things that I really enjoy about painting is developing the paint scheme and visualizing how it is achieved, kind of like backwords thinking.


Roy gave me some guidance on the colors he desired but left the design up to me...this always makes me a bit nervous as I really hope that what I come up with is met with enthusiasm from the end customer. In this case, I struggled with a design incorporating the colors Roy wanted; olive green, off white, yellow/orange highlights. I had two false starts where I backed off and rethought. I finally came up with something that balanced the conservative (by my standards :) ) colors and my need for fun. Roy got a cream panel and polka dot with grunge green background. I was hesitant about the colors, but they really came together nice.


I began by laying down the cream white. Once in place, I dryed it and then began the masking. A panel on the down tube and seat tube and 4 different sizes of dots across the canvas.


Once the masking is complete, I sprayed the green on top, which will end up becoming the base background.


Then the delicate work began, carefully removing the masks using a razor blade, a steady hand, and some granny glasses so my aging eyes can see.


After the color is complete, a coat of clear is applied and force baked for 30 minutes at around 400 degrees...mmmm, smell that cooking?


A good sanding to smooth the texture, then its decals, another clear/bake/smooth, and finally the third and final clear ran really hot with double reducer so that it burns into the previous coat, evening any dry spray (orange peel) and giving a glassy finish.


The frame is baked again and finally finshed with a good rub down of 3M compound.

Then it's time to show it off!


Hope Roy likes it.


It's a shame that most indy builders don't spray their own stuff any more, I really enjoy tying the project together with a little eye candy to match the performance. It's very rewarding.


Catch y'all in a few days, I'm going to catch up on a bit of sleep!


cheers,


rody

Wednesday, January 23, 2008

Are we learning the art of framebuilding?

So that's the question.

It's been a bit amusing to watch the interaction on some of the more prominent frame building web sites in regard to how "new" builders learn the craft while the "old" guard fervently protect their adament beliefs.

What's the point of contention, you may ask?
The crux is...How does one go about learning the craft of building hand made bicycle frames.

See, a lot of the established builders have been blessed (a point that I strongly believe) with the opportunity to learn from an established master in an apprentice role. These present craftsman seized a rare moment in time when another was willing to share and guide the development of another. Techniques, tips, and dare I say secrets, were passed on in an environment that spawned growth and mastery. Experience earned through years of trial and error was given to the new assistant, expediating the opportunity for self reliance under a watchful eye. The value of such an education is difficult to qualify.

Flash forward to today...the cycling market went through some rough years where a lot of these small production shops have since closed there doors. Builders that have survived have done so by scaling back manpower, production, and financial exposure. Most operate independant one man shops with tight budgets and are protective of the freedom to self schedule and pace the work environment. This necessary down scaling has almost eliminated the ability to host an untalented apprentice who places time demands and attention away from the workload, requiring a greater emphasis on instruction.

So where can someone go to learn the craft? Often the answer is a formalized abbreviated course such as the one offered by United Bicycle Institute or Doug Fattics small group instruction. Such courses are an excellent introduction to the methods utilized to put together some tubing into a frame, but in no way certify you as a practioner of fabrication.

Here's where the crux emerges....the old school say's "Such courses expose the student to the process, they do not assist with mastery...only a long term relationship/work experience can do that"

The newbies say "How am I suppose to learn this stuff if I can't get a job anywhere, this is the next best thing."

Most of this has been a rhetoric review for those that browse the forums, but now I'm ready to get to my point.

I constantly have individuals emailing, calling, and stopping by wanting to know how to learn the craft of framebuilding. Most are ready to attend a class, may have even purchased their first tubeset, but have no idea how to go about it. This is what I typically suggest...

Put the tubes/lugs/rod/torch/dreams of riding your own frame in a week away and take a deep breath because what I am about to propose will take you on a journey of focus and execution and when you are done, you will not even have a frame to show off.

To truly learn the art of framebuilding, build a fixture first.

I know, it's not sexy, but there is no better way to fully understand bicycle design and fabrication.

The process of designing a fixture demands that you fully understand how a frame is put together, how all the parts interact and the physical relationships between them. A fixture must establish those relationships and be exacting to the highest tolerance. As if that was not hard enough, an excellent fixture design is variable, allowing for frame sizes from silly small to Amazon Women tall, and wheel sizes from circus tiny to Bigwheel big. Accuracy and repeatability are key.

In addition to accommodating a varied build profile, you must think through the fabrication process and design the fixuture so that it enhances your access and ease of construction, rather than impede it. Have you left sufficient access for all joints, does the fixture allow for easy rotation, multiple positions, and welding/brazing in the jig? Do you have sufficient set off to get into the backside of all the joints? Not an easy task to accomplish.

These are all considerations that force you to fully understand bicycle design and fabrication before ever picking up a file or torch. By the end of the process, you'll have thoroughly disected the design, fabrication process, and gained invaluable skills in metal craft. Armed with this knowledge and experience, you have set yourself up with a far greater skill set than someone who chose to build without a fixture or purchased one.

It is unfortunate that in most's desire to come to the end product, they cheat themselves of a process that affords an opportunity to learn so much that will facilitate a more enjoyable and efficient building experience.

You can buy a fixture...you can not buy the knowledge and experience that fabricating one will afford you.

Want to be a builder?

Be ravinous in reading, focused and detail oriented, methodical in exacting repitition, and of utmost importance, be an advocate for yourself.
Oh, and build yourself a fixture. :^)


cheers,


rody

Tuesday, January 22, 2008

A big ol round up for ya!

It's late Tuesday night and I'm winding down before hitting the sheets...been a busy couple of days and I've gotta get up in 4 hours, ughh.


I'm going to hit y'all with a collage of photos tonight with a few comments thrown in for fun to catch up on the last couple of days.


Saturday began bright and early with some component build work for the upcoming Handmade Bicycle show. As my office is becoming over run with parts for the show bikes, I thought I'd better begin getting some of them together. Below is a bit of the effort from Saturday...2 Rohloff wheels, a couple of Phil Wood/Mavic wheels, and a few Chris King parts thrown in for good measure.


Sunday saw a visit from the crazy fast man himself...Dick Akers. Dick stopped by to pick up his new Groovy Cross bike. This bike will serve as his winter ride capable of fast group rides, light off road cross fun, and as his long distance race bike. The build consists of some Luv Handles, 9 speed grip shift with carbon derailleur, Saint cranks, Phil Wood wheels and Mavic rims...Sweet! This bike is made to take the abuse that Dick serves out daily. Have fun my man.


Then guess who came strolling into the shop...that's right, it's HOSS. No, not the one from Bonanza, this one rides a bike :^) Hoss is the proud recipient of a freshly coated Slinghot fork that we replaced the steerer tube in. Now the 'shot is ready to launch.


Monday was like a vintage christmas come late...lot's of vintage frames that are scheduled for some structural work and new paint arrived. Can you name all these classic frames? Don't scroll down until you give it a try...answers below.


Classic steel left to right; Serrota T-max, Yo Eddy, Grove Assault, Yo Eddy, and a Hot Head bar.

Today I finished up Tony's Ho Down fork with three coats of clear. Yeah, I know, crappy pic but it was getting late. This fork utilizes a rectangular box crown, 1.0 inch blades and scallopped dropouts. This fork is destined for his Trimble (one of many :) ). Can't wait to see some build pics with it all finished.


While spraying the forks, I began work on my last show frame, a Big Wheel made with Columbus, Dedda, and custom drawn steel. This frame will use Paragon sliding dropouts which will allow for Rohloff, single speed, or geared use. The frame is a bit more utilitarian than the intensive work that went into Roy's Jefe, but will still have some nice touches like custom dual Rohloff cable guides.

I've posted up a few pics of working on the rear end for your enjoyment...I know sexy curves make me all hot and bothered!


Tomorrow, I'll braze up the rear stays, weld up the rear triangle and braces, and throw on some braze ons and she'll be fini!
I'm heading into paint Friday through Monday to jam out all these show bikes so I will be a bit tardy answering email and blogging as I'll be a bit focused, but that doesn't mean that I don't luv y'all. Perhaps I'll post up some in process paint pics...don't want to give away too much though ;^)
See you in a few days,
rody

Saturday, January 19, 2008

A sweet retro/classic ride...

I finished up one of the show frames yesterday...don't want to give too much away but it will be a sweet ride in the classic mtb style. I've called on some friends in the vintage community and scraped together a pretty neat build for this one. Big props go out to Jeff Archer at First Flight bikes and my friends in the vintage community for keeping the flame alive. This one will be fun for me and those involved, I hope some folks who see it appreciate it as well.

I brought in an intern today, I had hoped for some cheap third world labor but decided to invest in our country's folks instead. Em will be taking on the important tasks in the shop; cleaning up chips on the mill and lathe, sweeping floors, and generally looking cool. Glad to have her...she's a straight A student, hip, and works cheap :^)

Attention OSHA...please note the required safety glasses, ear protection, gloves, and requisite sucker.

Going to be building wheels today for Dicks 29er and some of the show bikes. Got a box of uber shiny parts from Phil Wood, some bomber rims from Mavic, and some spoke lovin from the Swiss...should be killer.

Here's a random shop photo to stimulate the eyes...


Catch y'all tomorrow,

rody

Thursday, January 17, 2008

I think the sun came up today???

Whew, long days in the shop.
You know it's been a long day when you've run through your Ipod twice, the battery died, and there's still more to do!

Today started in the shop at 0600 and I'm just winding down to go home (2200)...the family stopped by today to remind me what they look like...that was the highlight of the day for sure :)

Not sure if the sun came out today or not? Aw heck, it's Ohio, of course it didn't!

Well, Roy's Jefe took the final step before paint, a quick trip through the blast cabinet and now it's hanging ready for some liquid vibrance. I'll build the fork next week when I do some others for my show bikes and then I plan on four days sequestered in the paint booth to spray everything up. Anybody have any favorite scheme's that they'd like to see?


With Roy's frame completed, it was turbo speed onto some other work.

I got an entire frame almost done today, working like mad and burning my fingertips cause I was too impatient to wait for things to cool. Still have to put on a few braze ons and finish the dropout details, build a bar for it, and it's on to the paint queue as well.


Mike, of Sherrick Photography, stopped back with some images that he shot yesterday. Here's a cool shot for you to enjoy...

The wait list is growing quickly, I apologize that I have not had an opportunity to update the official list on the web site, http://www.groovycycleworks.com/ , but I'll get to it soon. If you are wanting a frame/fork/stem/etc... in the near future, drop me a line soon. I'm hopeful that I'll bring home some orders from NAHBS to fill out the year.

And the quote of the day that has been running through my head (don't know why?)
"Damn your black heart Barbara Striesand!"
Anyone know who said it? Loved that episode!


Til tomorrow,


rody

Magura Firm Tech brakes...the Anti Christ?

The final piece of the puzzle for Roy's bike, the Magura Firmtechs...here's a brief run down of the Saga thus far...
- Contacted by Roy to utilize these ground breaking (pun intended :) )brakes on his new frame

- Contacted Magura USA and asked "hey guys, can I get a set of these with the required dimensions for mounting"
- First response...NO, these are for our suspension forks only and cannot be fitted to a frame
- Second response...Oh, all right, we want to support the small builder, we'll send you the brakes and info
- Two weeks pass...no brakes or info, call again. They forgot to process the order.
- Two more weeks pass...got a package in the post, very happy! Wrong brakes, very sad.
- Another call...Me -"may I talk to Austin, this is in regard to the Firm Tech brakes", Magura -" Oh, Austin quit. You can't get those, they are only for use in Europe." Me - "these will be used in Europe", Magura - "I'll talk to Germany and get back to you."
- Weeks pass again
- Another call..."Magura will sell you the brakes if you will buy a case" (that's 100 pairs), No thanks!
- Roy buys the brakes from across the pond and sends them to me, yeah! Parts are missing, whaa!
- Roy gets seller to send the parts, they arrive two days ago, hurray!
-Call Magura..."hey guys, I need the dimensional specs for the mounts, are you ever going to send the info?" Their response, "No, we don't have it." Hmmm...I thought they manufactured the damn things?
-Set upon the path of reverse engineering the mounts based on the brakes in hand.
So, yesterday, I spent 5 hours making the prototype mount. Why so long, you ask. Because nothing in custom frame building goes as quickly/smoothly/efficiently as you want it to when you are doing something out of the norm, and this project has had a few of those criteria.

These mounts have eight different dependant dimensions, what that means is that all the dimensions are related to each other, if one is off, the mount will not function correctly. The first proto mounted up well but then the post alignment for the quick release was off by .010", enough to gum up the whole shebang...back to the drawing and the mill.

Eventually I got the design nailed down, three more hours saw the balance of the pieces fabb'd up, then the next issue arose...the brakes were designed around the spacing of a wide suspension fork and cannot be milled/mounted for a more narrow space. Some of the new forks use almost 5 inches of space between the centerlines of the legs, I built Roy's fork with a traditional 4 inch centerline. So, what's that mean for us? I have to build another fork for Roy with wider leg spacing to accommodate these brakes. Once again, a step that could have been solved with appropriate dimensional info.

So, the good news is that despite Maguras proclamation that it cannot be done and refusal to share any dimensional info, we succeeded! I'll eventually post the required fabrication info on the web so future builders who wish to use these brakes will have the info in front of them. The brakes work VERY nice and are rim crushing strong. Good brakes, bad customer service/support.
So, here is a little something special for Magura...the onion ring of NO'ness!
Pretty cool ring I got with my supper tonight. I thought about selling it on Ebay, ya know, kinda like the piece of toast with the virgin Mary on it, but decided to keep it for "future use" instead :^) .

cheers,
rody

Tuesday, January 15, 2008

Luv Handles for your pleasure...

Today was a mixed day in the shop, got a lot of little stuff done but made no real progress on some of my bigger projects.

I started the day off by finishing the Luv Handles with some decals. The lucky recipients of these smooooth bars are Jason (2 sets), Eric, and Wade; thanks guys! I had a few of this run left for stock, but after a thread on MTBR discussing On One Mary bars that have failed, Jim from Cali gave a little cheer for the Groovy product, posted a link, and just like that, the remaining few were sold by noon...better make some more :)


It's our plan to have a number of bars at the show, so if you will be in Portland for NAHBS, stop by the booth and I'll hook you up with some show pricing...boo yah!
Woo town Eric stopped by the shop to show off his DJ bike, an orange Trek Jack with a Groovy Ho Down fork and new white wheels (how pimp!).

Eric took the ride to Ray's and stirred up a lot of interest in the fork. I feel like an evangilist...keep spreading the word my brothers!

A couple hours were burnt up with cleaning the shop. Mike, of Sherrick Photography (http://www.sherrickphotography.com/), is stopping by tomorrow to shoot some photos for the NAHBS booth. He's a killer photographer and I'm looking forward to getting some cool shots to intrigue people and tell the story about Groovy.

As the evening has wound down, I unpacked the brake parts for Roy's Firm Techs and started some prelim work on the design for the mounts...should not be too hard (fingers crossed) and hoping that I can get them machined and on the frame/fork tomorrow.

Til then friends, take care,

rody

Sunday, January 13, 2008

Some bar/stem lovin...

Hey folks,

Been a few days since I last posted; caught up on some of the "business" end of framebuilding such as paying bills, ordering materials/parts, posting items, etc...

The unfortunate truth is that very little time in building frames is spent building frames :^)

I spent today fabbing up the Bar / Stem combo for Roy's bike. Requested was a combo piece with 135mm reach, 10 degree rise, 60cm width, with a gentle bend.

Although the bar/stem is only made up of four parts, it takes 34 individual processes to fabricate them.

Here's a shot beginning to bore the custom binder bolt...

And a shot of the binder bored, tapped, and relieved for the head of the stainless allen bolt.

The binder is designed to seat against the steerer section through the stem extension, so I relieve the adjacent profile to give a firm, tight fit so it is very strong once brazed.


This piece is reminiscent of the old Grove Hotheads in that I like to use an oval extension as well. The bars, however, are 7/8" .035" 4130 without the compound bend in the palm that made the Grove's famous, instead utilizing a straight grip area to facilitate fitting the Rohloff shifter and it's large surface area.


I pierced the oval extension and placed the steerer tube piece through it and brazed in a custom pinch bolt to the rear, giving it a very clean and effective look.


In this shot you can see how the binder will sit behind the steerer section...the additional material behind the bolt will be filed off to give a smooth profile once completed.


and using an 1/8" end mill to slot the binder and rear of the stem.


And a pic of the basic layout just prior to welding...

I mocked up the bike with the frame, fork, bars, and a post with saddle just to see how it looks...everything came out exactly as I had hoped. She's dead sexy from behind (wink, wink)


All that is left to do is to custom fab the firmtech brake mounts (yes, the final parts arrived!) and braze on the chain stay cable guides I made.


Then a quick blast in the cabinet and it's into the paint booth...I've got some awesome plans for this one.

cheers,


rody

Wednesday, January 9, 2008

Frame all welded up...

Gonna be a quick post tonight folks, as it's been a long day and I'm ready to go hit the showers.

Things to do today...

- tack rear end...check

- miter ss brace...check

- slot the eccentric bb...check

- weld up frame...check
- check alignment...check
- win 20 million bucks so I can build bikes for people for free...nope, not today :(

That pretty much sums up the day, enjoy some pics!
The frame welded up very smoothy, the bead ran nice and hot and washed to the edges for a nice even transistion to the base metal.
Here's a shot of the bottom of the bike with the custom machined eccentric in place. The extra blind hole drilled in the eccentric is to allow you to use a allen key/screwdriver/etc placed in the hole and then leverage off the crank to rotate the bb position, thus tightening the chain.
A shot with the fork loosely placed to give an idea of the flow of the lines and one with some mock up wheels for a better "real world" look.

Tuesday, January 8, 2008

Moving right along...

Hang onto your seats, we're going to catch you up for a couple days worth. When we last left off, I was whining about my bumps and bruises and we had started to bend up the brass inner liner for Roy's bike...flash forward to the present.
The next task on the list was to finish up mitering the seat stays. As the stays are fairly large in diameter, I cut one at a time to insure I had enough room in the jig...plus it gives you a better view :^) .


Next up, I silver brazed the seat post clamps, mitered the seat post relief, and then got back on the cables routing.
First course of action for the internal routing is to mark the centerines of the tube and then orient the internal routing to insure that the entry and exits are located within the thicker butted section and are not in the highest stress plane of the tube. I choose a down tube with plenty of beef in the ends as I knew we would be running internal cables and braze ons for the Crud Catcher...evidently those are very needed in the Netherlands, gonna have to go and find out for myself!
Next up was drilling the starter holes and filing to shape; a nice elongated slot that will be easier to feed the cables through.

Feeding the inner brass tubing is a bit of a challenge, as it is very fragile and not very cooperative. Gotta take your time, persuade it here and there, and remember not to cuss too much ;^)

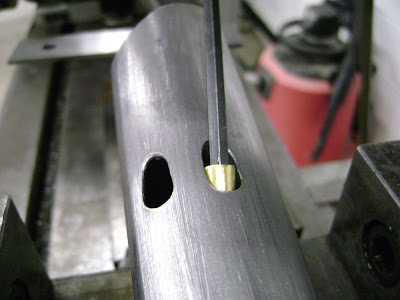
Here's a shot of the Down Tube with the brass tubing in place. I repeated the process for the top tube as well.

Once in place, it was lots of flux, a little 56% silver, a bit of filing and wha lah!


These guides turned out incredibly sexy...I almost hate to give this frame up as it will be very clean and elegant.

A lot of scrubbing, a final check for proper alignment and then I began tacking the front triangle.


I tack the frame sequentially to limit any torsional pulling on the tubing and then weld everything in the fixture rather than take it out to finish as most builders do. I weld in the fixture as it maintains perfect alignment and I end up with little to no post weld alignment to do...that's a stonger, straighter frame for you!


Tomorrow I'll get the frame fully welded up and hopefully (everyone cross their fingers) the final pieces for the Firm-tech brakes will show up so I can start making some custom bosses.

cheers,
rody